


Introduction
Hello there! Welcome to the wonderful world of DOM manipulation in JavaScript. Knowing dom is like a superpower by which you get to build and change things in the virtual world of the web, all with just a few lines of code. And let's be honest, who doesn't love making things happen on a webpage?
In this blog, we'll explore the magical powers of JavaScript and the Document Object Model (DOM), which allows us to interact with and manipulate the elements of a web page. Don't worry if you're new to all this – we'll start with the basics and work our way up to some more advanced techniques. So, get ready to dive into the fascinating world of DOM manipulation!

Understanding the Document Object Model (DOM)
Document Object Model (DOM) is a programming interface for web documents. It represents the page so that programs can change the document structure, style, and content. The DOM is an essential part of web development because it allows developers to manipulate web pages dynamically. In this blog, we will learn how to manipulate the DOM using JavaScript.
Simply it's accessing HTML elements from javascript.
Here's an example of a simple HTML document:
<!DOCTYPE html>
<html>
  <head>
    <title>DOM Manipulation</title>
  </head>
  <body>
    <h1>Hello, world!</h1>
    <p>Welcome to my blog.</p>
    <button>Click me!</button>
  </body>
</html>
The Document Object Model (DOM) is a hierarchical structure that represents the web page in the browser. Each element in the page is represented as an object in the DOM tree, with its properties and methods. The DOM provides a way for web developers to access and manipulate these objects using JavaScript.
The DOM tree for this HTML document looks like this:
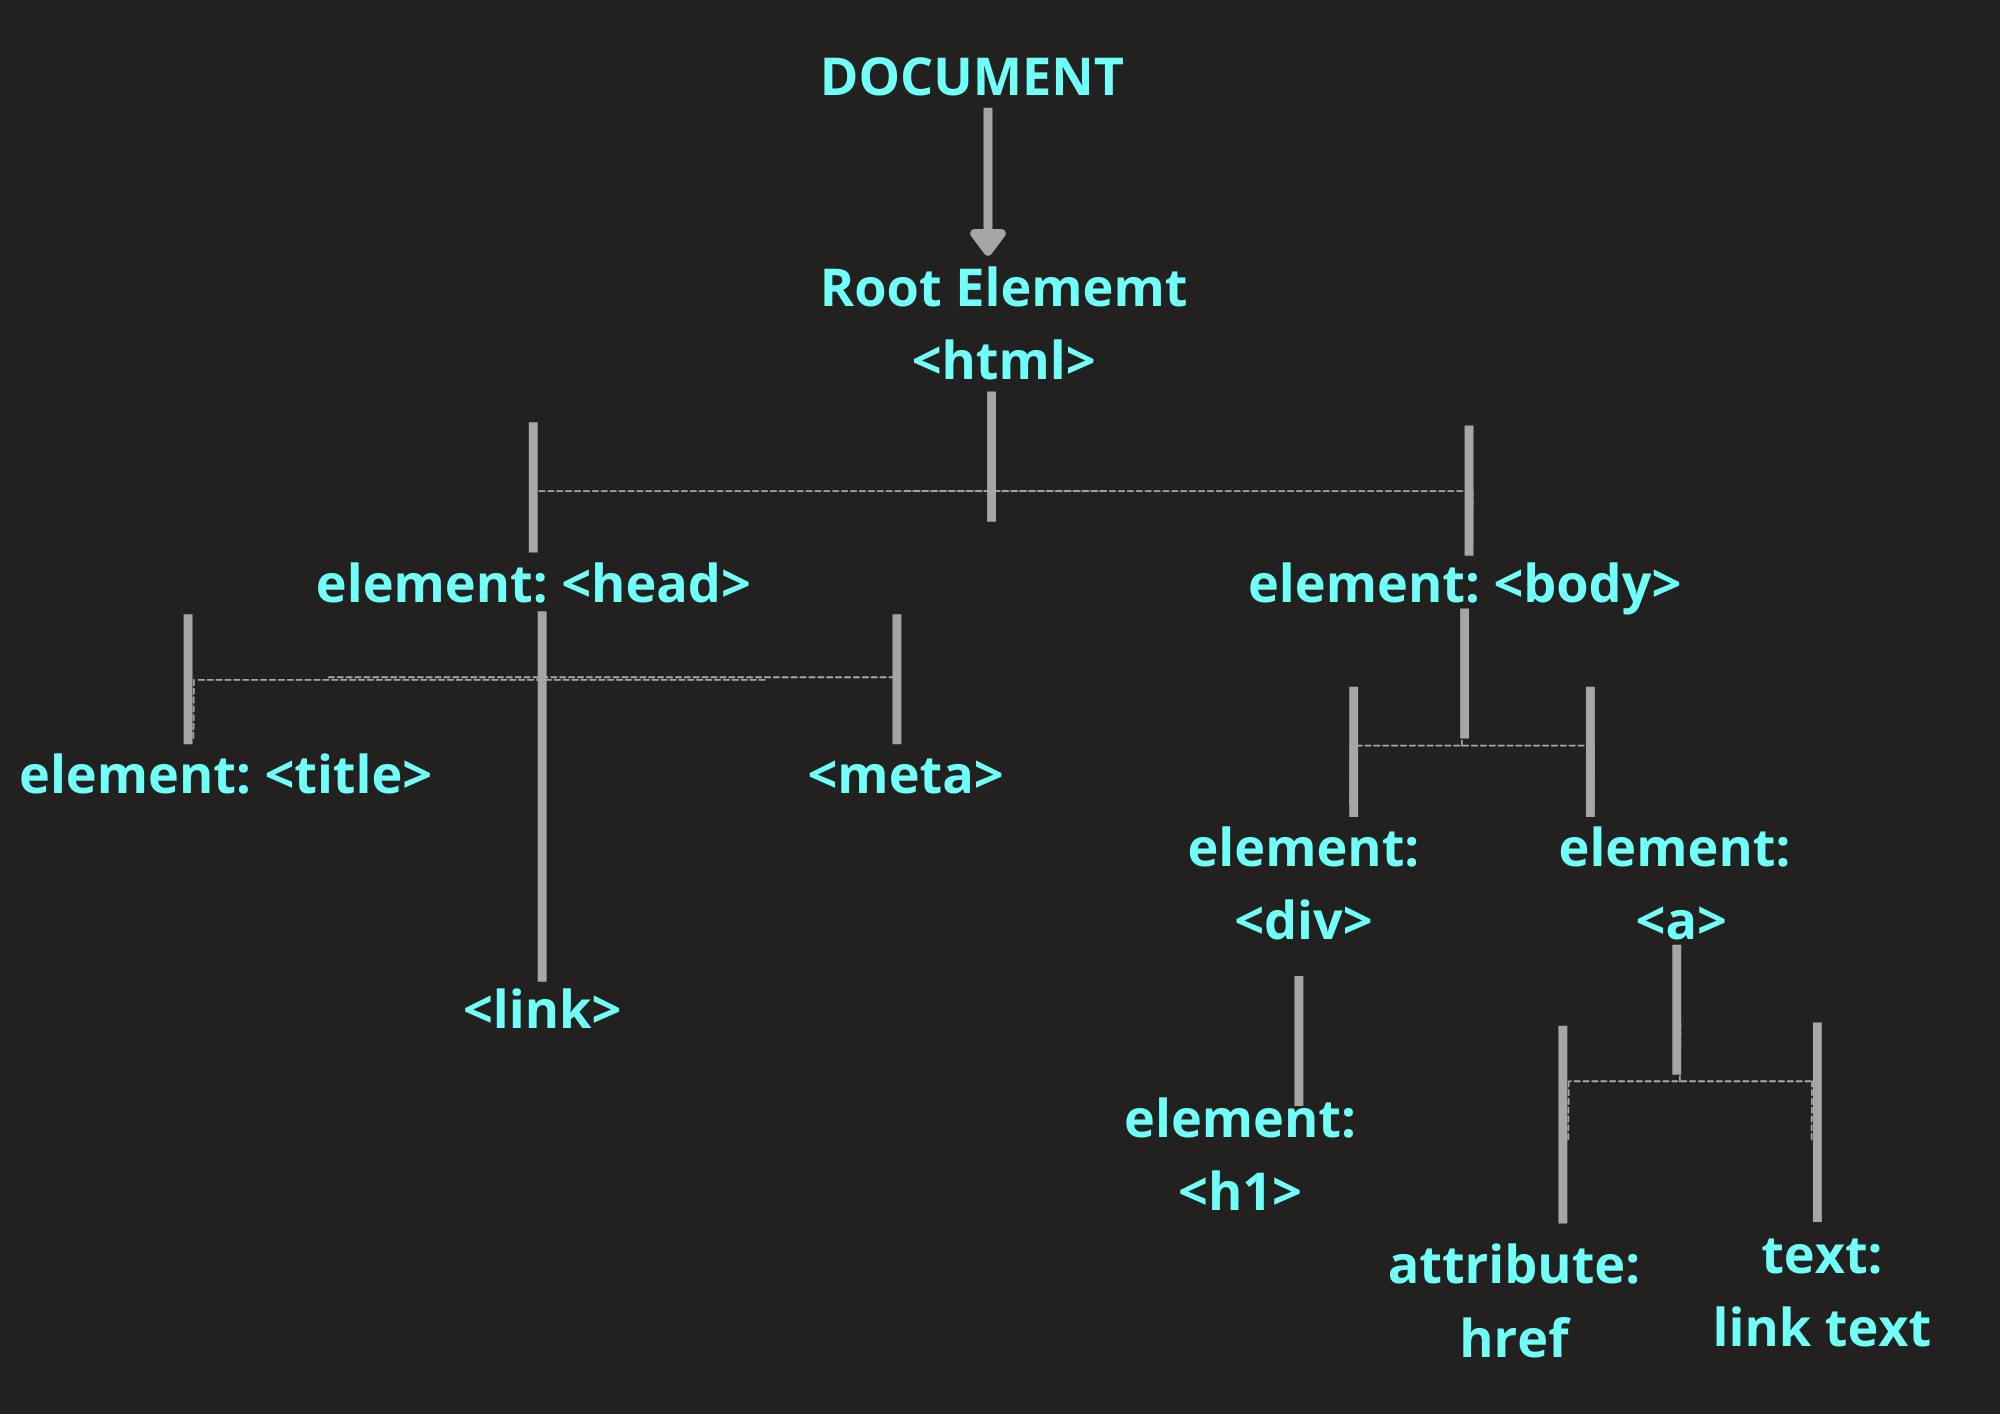
The <!DOCTYPE html> and <html> tags are not represented in the DOM tree because they are not elements. The <head>, <body>, <h1>, <p>, and <button> tags are all elements in the DOM tree. The <title> tag is also an element, but it is nested inside the <head> element.
Accessing Elements in the DOM
Now that we have a basic understanding of the DOM, let's learn how to access elements in the DOM using JavaScript. There are several ways to access elements in the DOM, but the most common way is to use the document object, and they are:
querySelector & querySelectorAll
The querySelector and querySelectorAll methods allow you to select elements on a web page using CSS-like selectors. These methods are incredibly powerful and flexible, as they allow you to select elements based on a wide range of criteria, such as tag name, class name, ID, attribute value, and more.
Here's an example of how to use querySelector to select the first paragraph element on a page and change its font color:
let myElement = document.querySelector('p');
myElement.style.color = 'red';
And here's an example of how to use querySelectorAll to select all paragraph elements on a page and change their font size:
let myElements = document.querySelectorAll('p');
for (let i = 0; i < myElements.length; i++) {
  myElements[i].style.fontSize = '20px';
}
getElementById
The getElementById method allows you to select an element on a web page by its unique ID attribute. This method is particularly useful when you need to select a specific element that has a unique identifier.
Here's an example of how to use getElementById to select a paragraph element with the ID "my-paragraph" and change its font family:
let myElement = document.getElementById('my-paragraph');
myElement.style.fontFamily = 'Arial';
getElementsByClassName
The getElementsByClassName method allows you to select elements on a web page by their class names. This method is useful when you need to select multiple elements that share a common class name.
Here's an example of how to use getElementsByClassName to select all paragraph elements with the class "my-paragraph-class" and change their font-weight:
let myElements = document.getElementsByClassName('my-paragraph-class');
for (let i = 0; i < myElements.length; i++) {
  myElements[i].style.fontWeight = 'bold';
}
getElementsByTagName
The getElementsByTagName method allows you to select elements on a web page by their tag name. This method is useful when you need to select multiple elements that share a common tag name, such as all <p> elements or all <img> elements.
Here's an example of how to use getElementsByTagName to select all paragraph elements on a page and change their font color:
let myElements = document.getElementsByTagName('p');
for (let i = 0; i < myElements.length; i++) {
  myElements[i].style.color = 'blue';
}
Remember everyone when we are writing document.getElementByID it means that document is an object and getElementById is a method of the object document.
Manipulating Elements in the DOM
Now that we know how to access elements in the DOM, let's learn how to manipulate them, which means how to change those elements according to our convenience. There are several ways to manipulate elements in the DOM, such as changing their content, attributes, styles, and position.
HTML document is structured as a JavaScript Object. Every HTML element has different properties which can help to manipulate it. It is possible to get, create, append, or remove HTML elements using JavaScript.
Changing Element Content
To change the content of an element, we can simply update its textContent or innerHTML property. The textContent property sets or returns the text content of an element, while the innerHTML property sets or returns the HTML content of an element.
Here's an example of how to change the content of the <h1> element in our HTML document:
h1.textContent = 'Hello, DOM!';
In this example, we used the textContent property to change the text content of the <h1> element to "Hello, DOM!".
Here's an example of how to change the content of the <p> element in our HTML document using the innerHTML property:
const p = document.querySelector('p');
p.innerHTML = 'Welcome to my <em>awesome</em> blog!';
In this example, we used the innerHTML property to change the HTML content of the <p> element to "Welcome to my <em>awesome</em> blog!". The <em> tag is used to emphasize the word "awesome".
Changing Element Attributes
To change the attributes of an element, we can simply update its attribute values using the setAttribute method. The setAttribute method takes two arguments: the name of the attribute and its new value.
Here's an example of how to change the src attribute of an <img> element:
const img = document.querySelector('img');
img.setAttribute('src', 'path/to/new/image.jpg');
In this example, we used the setAttribute method to change the src attribute of the <img> element to "path/to/new/image.jpg".
Changing Element Styles
To change the styles of an element, we can simply update its style properties using the style object. The style object contains properties for all the CSS styles that can be applied to an element.
Here's an example of how to change the background color of the <body> element:
const body = document.body;
body.style.backgroundColor = 'red';
In this example, we used the style object to set the backgroundColor property of the <body> element to "red".
Changing Element Position
To change the position of an element, we can simply update its position properties using the style object. The position properties include position, top, bottom, left, and right.
Here's an example of how to move an element to a new position:
const element = document.querySelector('.element');
element.style.position = 'absolute';
element.style.top = '100px';
element.style.left = '100px';
In this example, we used the style object to set the position property of the .element element to "absolute", and the top and left properties to "100px".
Adding and Removing Elements
To add a new element to the DOM, we can use the createElement method to create a new element, and the appendChild method to add it to an existing element.
Here's an example of how to add a new <div> element to the <body> element:
const div = document.createElement('div');
div.textContent = 'Hello, world!';
document.body.appendChild(div);
used the innerHTML property to change the HTML content of the <p> element to "Welcome to my <em>awesome</em> blog!". The <em> tag is used to emphasize the word "awesome".
Tips
Use
querySelectorandquerySelectorAllto select elements whenever possible, as they are faster and more efficient than other selection methods.Cache DOM element references whenever possible, to avoid repeated lookups and improve performance.
Avoid using inline styles and instead use CSS classes and stylesheets to apply styles to your elements.
Use
textContentinstead ofinnerHTMLwhenever possible, to avoid security risks and improve performance.
By following these best practices and using the techniques and methods we've covered in this blog, you'll be able to create powerful and efficient web applications that make use of the full power of the DOM.
Conclusion
In this blog, we learned how to manipulate the DOM using JavaScript. We learned how to access elements in the DOM using the document object, and how to manipulate their content, attributes, styles, and position.
Manipulating the DOM is an essential part of web development, and it allows us to create dynamic and interactive web pages. With the knowledge gained from this blog, you should now be able to create more complex web pages and applications that respond to user input and update dynamically.
Remember to use the right tool for the job, whether that's querySelector for specific elements, getElementById for unique identifiers, getElementsByClassName for groups of elements, or getElementsByTagName for selecting elements by tag name. And if all else fails, just start randomly clicking on things until you figure it out (just kidding, please don't do that).
If you're interested in learning more about DOM manipulation, there are many great resources available online, including the Mozilla Developer Network (MDN) web docs and various online courses and tutorials.
Let's Connect
If you enjoyed this post and would like to stay updated on my work, feel free to connect with me on social media
If you find my blog helpful you all can always support me by sponsoring me!